

Ubuntu
Passwork installation guide on the OS:
- Ubuntu 20.04
- Ubuntu 22.04
- Ubuntu 24.04
The guide uses switchable code blocks to separate commands according to the operating system versions.
1. Minimum system requirements
Passwork is not demanding on system resources, and the required number of servers depends on the number of active users, the volume of stored data, and system fault tolerance requirements.
Please review the full system requirements.
If the server has 2-4 GB of RAM, we recommend enabling a SWAP file.
2. Basic actions before installation
Obtain root privileges and update the local package database:
- shell
sudo -i
apt-get update
Install the Apache2 web server and the curl data transfer utility:
- shell
apt-get install -y apache2 unzip curl zip jq
3. PHP installation
Install the software-properties-common package and add the ppa:ondrej/php repository:
- shell
apt-get install -y software-properties-common
add-apt-repository -y ppa:ondrej/php
Update the local package and repository list:
- shell
apt-get update
Install PHP and extension modules:
- shell
apt install -y php8.3 php8.3-cli php8.3-bcmath php8.3-fpm php8.3-curl php8.3-gd php8.3-intl php8.3-ldap php8.3-mbstring php8.3-mysql php8.3-opcache php8.3-pgsql php8.3-soap php8.3-zip php8.3-sqlite3 php8.3-xml php8.3-dev php-pear
Change the amount of RAM available for executing PHP scripts:
- shell
sed -i 's/^memory_limit\s*=.*/memory_limit = 256M/' /etc/php/8.3/fpm/php.ini
It is recommended to increase the memory_limit parameter from 256M to 512M or higher if a large number of users are expected to use Passwork.
Ensure that the php8.3-fpm service is running:
- shell
systemctl status php8.3-fpm
Start and enable the service autostart if it is stopped:
- shell
systemctl start php8.3-fpm
systemctl enable php8.3-fpm
3.1 Installing PHP MongoDB driver
Install the PHP MongoDB driver:
- shell
pecl install mongodb
Press Enter to accept the default build options.
Create configuration files to load and enable PHP MongoDB:
- shell
echo "extension=mongodb.so" | tee /etc/php/8.3/fpm/conf.d/20-mongodb.ini
echo "extension=mongodb.so" | tee /etc/php/8.3/cli/conf.d/20-mongodb.ini
4. MongoDB database installation
Download and convert the MongoDB GPG key to a file:
- Ubuntu 24.04
- Ubuntu 22.04 20.04
curl -fsSL https://www.mongodb.org/static/pgp/server-8.0.asc | \
   sudo gpg -o /usr/share/keyrings/mongodb-server-8.0.gpg \
   --dearmor
curl -fsSL https://www.mongodb.org/static/pgp/server-7.0.asc | \
   sudo gpg -o /usr/share/keyrings/mongodb-server-7.0.gpg \
   --dearmor
Add the repository line to the file:
- Ubuntu 24.04
- Ubuntu 22.04
- Ubuntu 20.04
echo "deb [ arch=amd64,arm64 signed-by=/usr/share/keyrings/mongodb-server-8.0.gpg ] https://repo.mongodb.org/apt/ubuntu noble/mongodb-org/8.0 multiverse" | sudo tee /etc/apt/sources.list.d/mongodb-org-8.0.list
echo "deb [ arch=amd64,arm64 signed-by=/usr/share/keyrings/mongodb-server-7.0.gpg ] https://repo.mongodb.org/apt/ubuntu jammy/mongodb-org/7.0 multiverse" | sudo tee /etc/apt/sources.list.d/mongodb-org-7.0.list
echo "deb [ arch=amd64,arm64 signed-by=/usr/share/keyrings/mongodb-server-7.0.gpg ] https://repo.mongodb.org/apt/ubuntu focal/mongodb-org/7.0 multiverse" | sudo tee /etc/apt/sources.list.d/mongodb-org-7.0.list
Update the list of available packages:
- shell
apt-get update
Install MongoDB using the apt package manager:
- shell
apt-get install -y mongodb-org
Start the mongod.service service:
- shell
systemctl start mongod.service
Enable service autostart:
- shell
systemctl enable mongod.service
5. Obtaining and configuring Passwork
Online
Obtain the script:
- wget
- curl
wget https://repos.passwork.pro/repository/linux/scripts/passwork.sh
curl -O https://repos.passwork.pro/repository/linux/scripts/passwork.sh
The Passwork installation script should not be located in the directory with the application server files.
Assign execution rights to the script:
chmod +x passwork.sh
By default, the passwork.sh script will perform:
- Creation of a hidden
.script_envfile in the current directory; - Creation of the
passwork_archivedirectory for Passwork backups; - Downloading the latest available Passwork version, signature, and public key;
- Installing the previously obtained archive to
/var/www/
To use a non-standard installation path, disable certificate verification, or change behavior, you can use script launch parameters.
Run the script:
sudo ./passwork.sh
On the first run, the script will request an API key and perform basic environment checks:
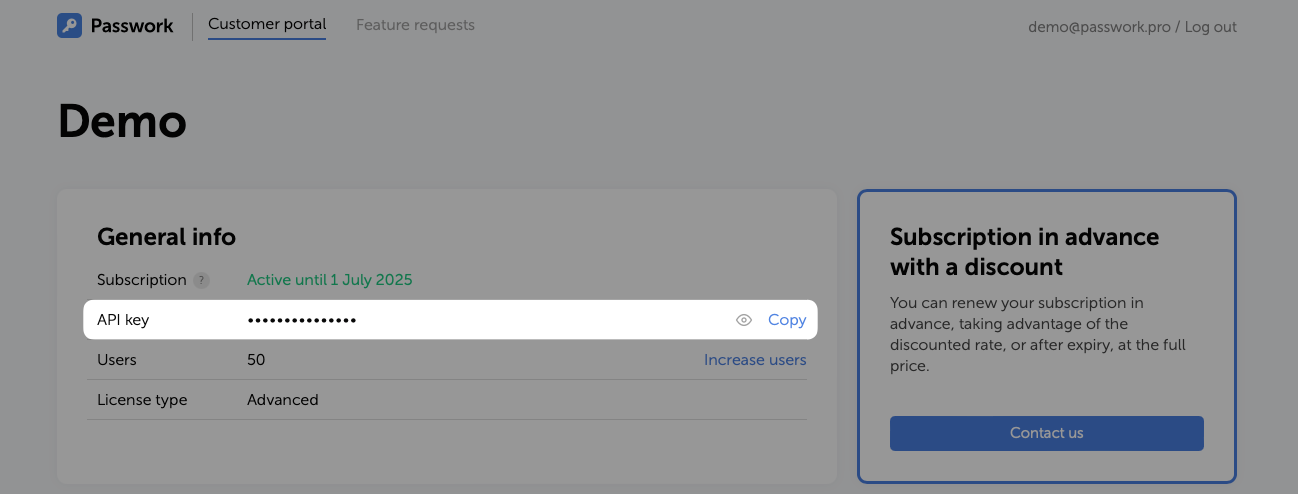
Example of successful script execution:

Offline
Obtain the script on another machine with Internet access:
- wget
- curl
- PowerShell
wget https://repos.passwork.pro/repository/linux/scripts/passwork.sh
curl -O https://repos.passwork.pro/repository/linux/scripts/passwork.sh
(New-Object System.Net.WebClient).DownloadFile("https://repos.passwork.pro/repository/linux/scripts/passwork.sh", "$PWD\passwork.sh")
Or obtain the passwork.sh script manually using the link
The Passwork installation script should not be located in the directory with the application server files.
Assign execution rights to the script:
chmod +x passwork.sh
Before running passwork.sh you need to:
- Obtain Passwork version 7 from our Customer Portal (mandatory);
- Place it in the launch directory or use the
--inputargument to specify the location (mandatory); - Obtain the archive signature and public key of Passwork (optional if using the
--skipargument).
By default, the passwork.sh script will perform:
- Creation of the
passwork_archivedirectory for Passwork backups; - Unpacking the Passwork archive;
- Installing the previously obtained archive to
/var/www/
To use a non-standard installation path, disable certificate verification, or change behavior, you can use script launch parameters.
After preparation, run the passwork.sh script:
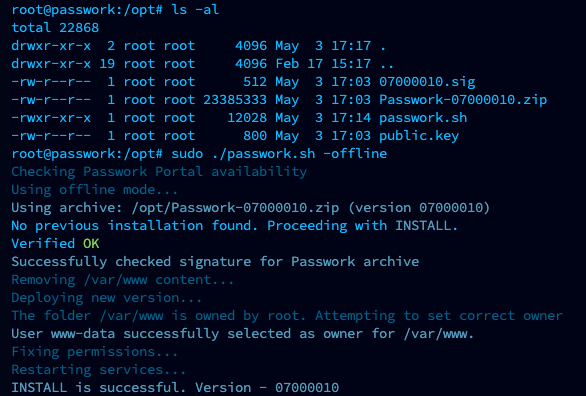
sudo ./passwork.sh -offline
Example of successful offline script execution:
6. Web server configuration for HTTPS protocol
To ensure proper operation, it is necessary to use the HTTPS protocol. Using HTTP will lead to errors.
6.1 Generating self-signed SSL certificate
Create a new directory to store the private key and certificate:
- shell
mkdir /etc/apache2/ssl/
Generate a self-signed X.509 certificate for Apache2 using OpenSSL:
- shell
openssl req -x509 -nodes -days 365 -newkey rsa:2048 -subj '/CN=your.domain.name' -keyout /etc/apache2/ssl/apache.key -out /etc/apache2/ssl/apache.crt
Common Name (CN)— It is important to specify your server's IP address or hostname here, as your certificate must match the domain (or IP address) for the website;
Set access rights for the root user to protect the private key and certificate:
- shell
chmod 600 /etc/apache2/ssl/*
6.2 Configuring virtual host for HTTPS access
Before configuring the web server with SSL termination enabled, it is recommended to review the configuration features.
Enable the SSL module in Apache2, allowing the server to support the HTTPS protocol:
- shell
a2enmod ssl
Enable the site virtual host configuration file with SSL connection settings:
- shell
a2ensite default-ssl
Open the virtual host configuration file for HTTPS connection:
- shell
nano /etc/apache2/sites-enabled/default-ssl.conf
Make the following changes:
- Add the
ServerNameline and changewww.example.comto the server's IP address or domain (depending on the value specified in the certificate'sCommon Name); - Uncomment the
DocumentRootline and change the path to the Passwork root directory (/var/www/public);
- shell
ServerAdmin webmaster@localhost
ServerName passwork:443
DocumentRoot /var/www/public
- Add the
<Directory>directive afterServerName:
- shell
<Directory /var/www/public>
    Options +FollowSymLinks -Indexes -MultiViews
    AllowOverride FileInfo
    Require all granted
</Directory>
- Update the paths to the certificate files generated earlier:
- shell
SSLCertificateFile /etc/apache2/ssl/apache.crt
SSLCertificateKeyFile /etc/apache2/ssl/apache.key
- Change the .php file handler, specifying proxying requests to the php-fpm socket:
- shell
<FilesMatch \.php$>
        SetHandler "proxy:unix:/run/php/php8.3-fpm.sock|fcgi://localhost/"
</FilesMatch>
- After making changes, verify that the virtual host configuration file matches the example:
- shell
<IfModule mod_ssl.c>
    <VirtualHost _default_:443>
        ServerName passwork:443
        DocumentRoot /var/www/public

        <Directory /var/www/public>
            Options +FollowSymLinks -Indexes -MultiViews
            AllowOverride FileInfo
            Require all granted
        </Directory>

        SSLEngine on
        SSLCertificateFile /etc/apache2/ssl/apache.crt
        SSLCertificateKeyFile /etc/apache2/ssl/apache.key

        ErrorLog ${APACHE_LOG_DIR}/error.log
        CustomLog ${APACHE_LOG_DIR}/access.log combined

        <FilesMatch \.php$>
            SetHandler "proxy:unix:/run/php/php8.3-fpm.sock|fcgi://localhost/"
        </FilesMatch>
    </VirtualHost>
</IfModule>
Enable modules and restart services:
- shell
a2enmod rewrite proxy_fcgi setenvif
systemctl restart php8.3-fpm
systemctl restart apache2
7. Completing parameter checklist
When first connecting to Passwork, you need to complete the parameter checklist, during which the following will be performed:
- Checking necessary parameters
- Connecting to the MongoDB database
- Choosing a data encryption mode
- Randomly generated key for encrypting data in MongoDB
- License key verification
After completing the checklist, you will be prompted to create the first user in Passwork, where you need to specify a login, password, and email address for sending notifications.
Additional component parameters, security settings, and Passwork system configurations are available in the advanced settings section.