SSO configuration with Microsoft Entra ID (Azure AD)
Before setting up SSO, make sure that the APP_URL parameter in config.env matches the current Passwork domain, example — APP_URL=https://passwork.example.com
The following Passwork server is used as an example — passwork.example.com
Adding trust relationship for the Relying Party
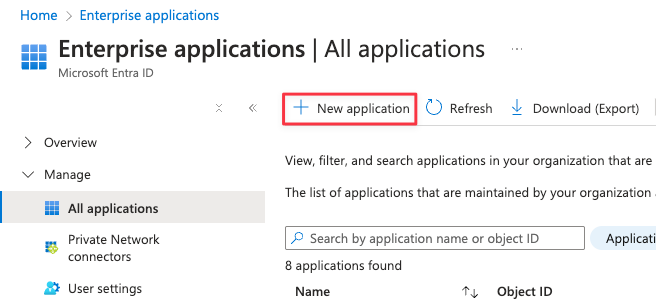
Log in to Microsoft Entra ID and go to — Enterprise applications:

Open — Manage → All applications and create a New application:
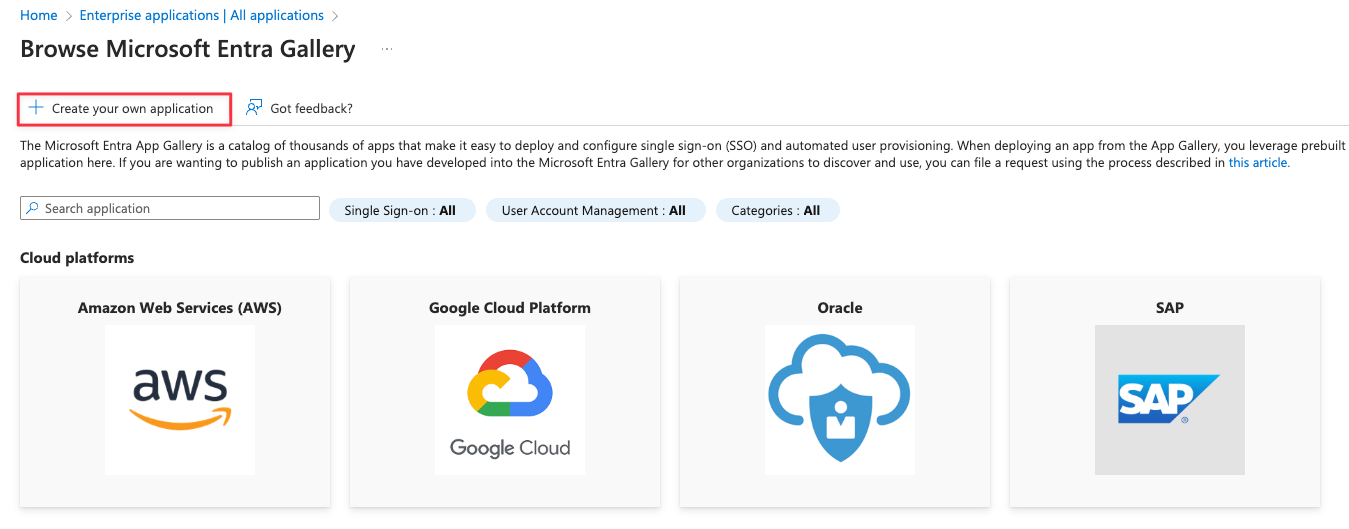
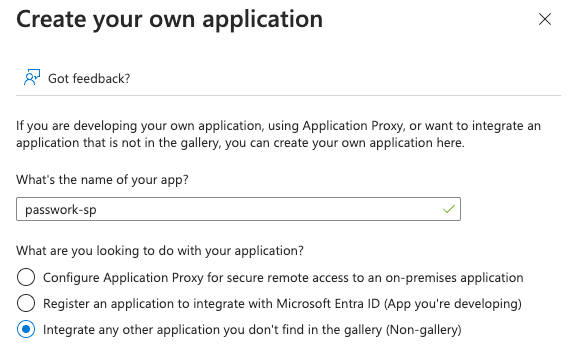
In the Microsoft Entra application gallery overview, select — Create your own application:
Perform the following actions:
- Fill in the Name (example: passwork-sp);
- What are you looking to do... — Integrate any other application you don’t find in the gallery (Non-gallery).
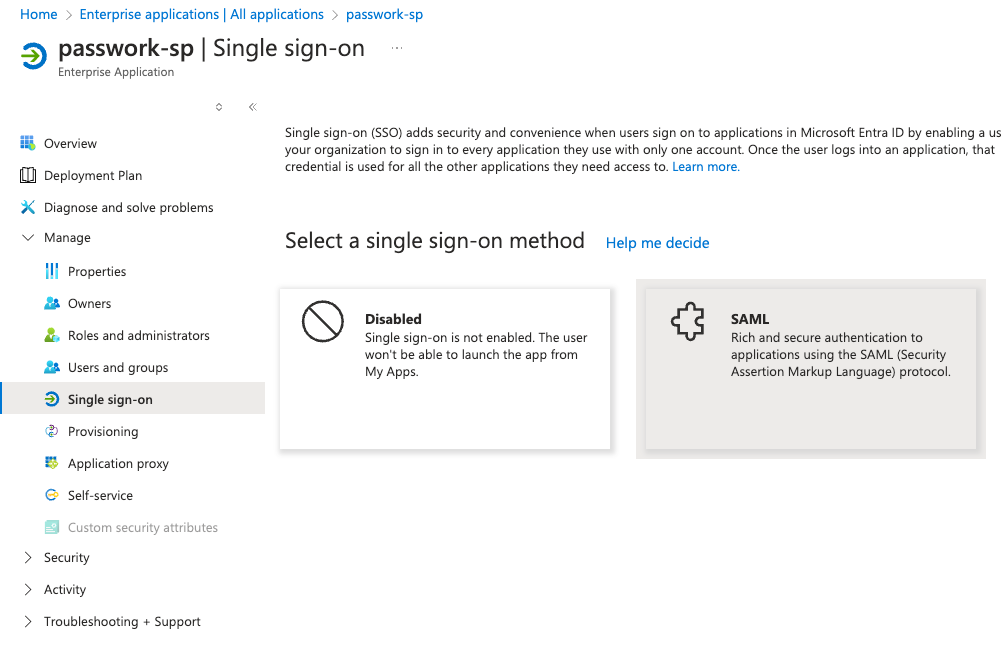
After creation, go to Manage → Single sign-on and open SAML:
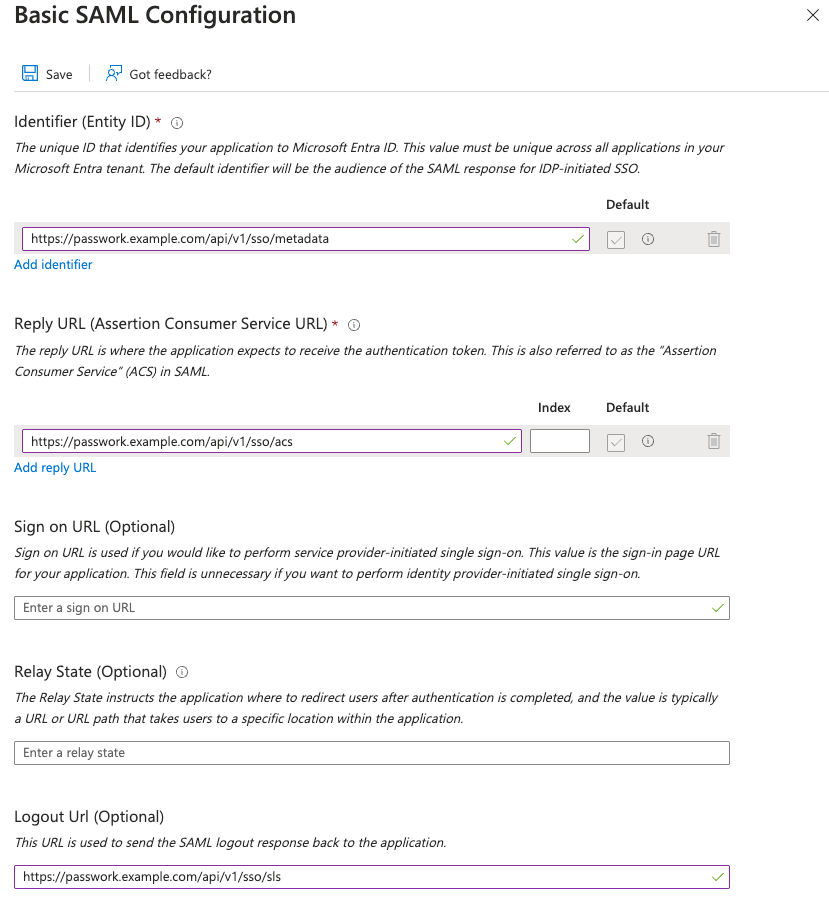
Open Basic SAML Configuration, click Edit.
Log in to the Passwork web interface and go to Settings and Users → SSO Settings, copy the authentication endpoint URLs from the SP (Passwork) to the IDP (Microsoft Entra ID):
- Identifier (Entity ID) — https://passwork.example.com/api/v1/sso/metadata
- Reply URL — https://passwork.example.com/api/v1/sso/acs
- Sign-out URL — https://passwork.example.com/api/v1/sso/sls
Example of filled authentication endpoints from SP:
Configuring request processing rules from SP (Passwork) in IDP (Microsoft Entra ID)
Depending on the desired user login format in Passwork, you can configure processing rules so that the user format can be one of the following:
- username
- [email protected]
Please choose the required user login format in Passwork and perform the configuration.
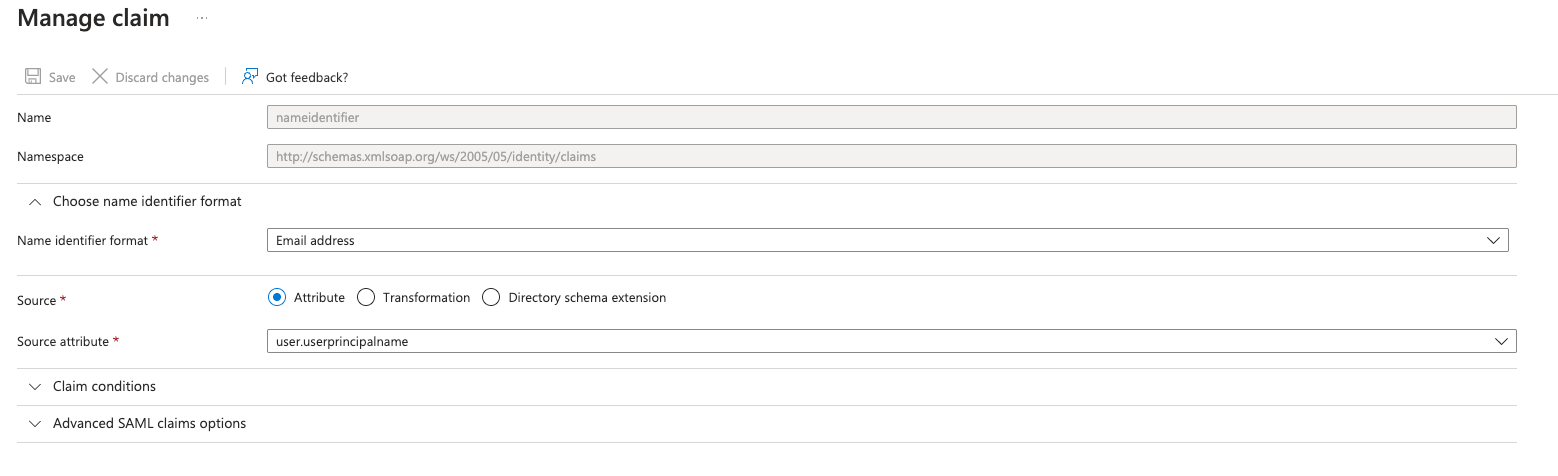
In Single sign-on with SAML configuration, open — Attributes & Claims:

Configuration of processing rules for [email protected] format
By default, after creating the application in Microsoft Entra ID, the user format after authentication in Passwork is formed as [email protected].
No additional changes are required. Example of the default created claim:
Configuration of processing rules for username format
Open Unique User Identifier (ID) and make the following changes:
- Source — Transformation;
- Transformation — ExtractMailPrefix();
- Parameter 1 — Attribute;
- Attribute name — user.userprincipalname.
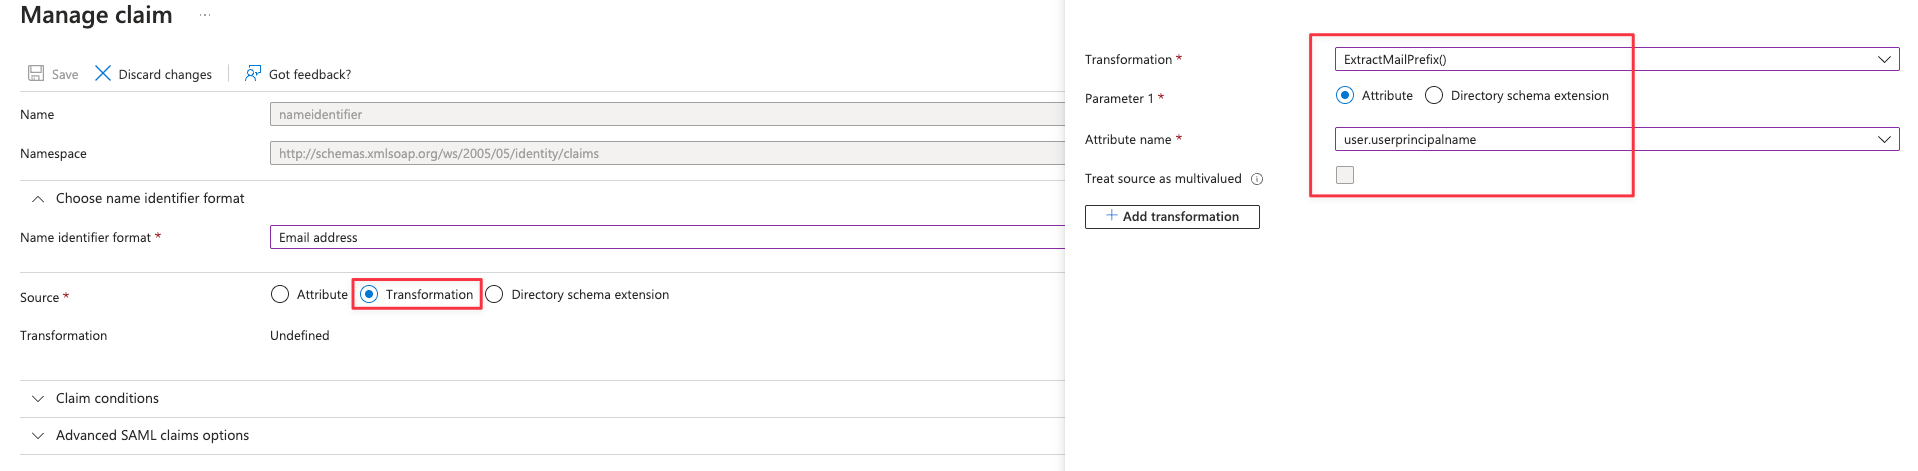
Save changes and go back to Attributes & Claims.
Configuring additional attribute processing rules for passing to SP
Go to Attributes & Claims and Add a new claim:
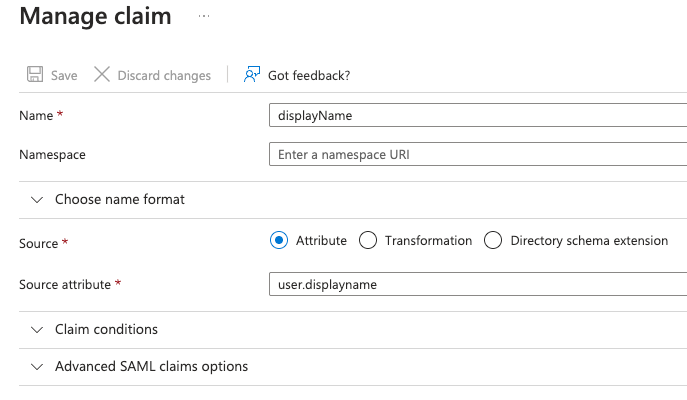
- Adding a new additional claim for displayName:
- Name — displayName;
- Source — Attribute;
- Source attribute — user.displayname;
- Save the created additional claim.
- Adding a new additional claim for emailAddress:
- Name — emailAddress;
- Source — Attribute;
- Source attribute — user.mail;
- Save the created additional claim.

Configuring and filling in Single Sign-On (SSO) parameters in Passwork
Filling in the "User Attributes" Values
Log in to the Passwork web interface, go to — Settings and Users → SSO Settings and fill in the mapping attributes:
- Email attribute — emailAddress;
- Full name attribute — displayName.
Filling in the "Identity Provider → Passwork" values
In Single sign-on with SAML configuration → passwork-sp setup, copy the authentication endpoint URLs:
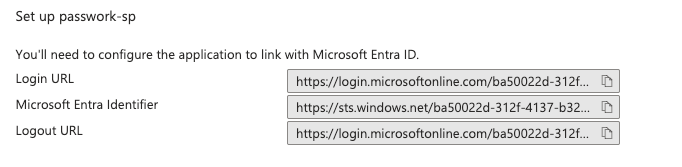
Open — Settings and Users → SSO Settings and fill in the values:
- Identifier (Entity ID) — https://sts.windows.net/ba50022d-xxxx-xxxx-xxxx-1145c6c9ed97/
- Login URL — https://login.microsoftonline.com/ba50022d-xxxx-xxxx-xxxx-1145c6c9ed97/saml2
- Logout URL — https://login.microsoftonline.com/ba50022d-xxxx-xxxx-xxxx-1145c6c9ed97/saml2
Filling in the "Certificate" Value
In Single sign-on with SAML configuration → SAML Certificates, obtain the SSL certificate in base64 format:
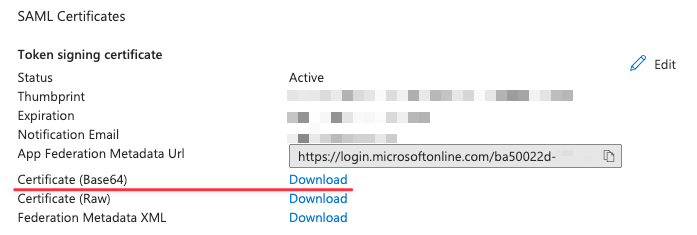
Open the obtained SSL certificate with Notepad, copy and paste it into the corresponding field — Settings and Users → SSO Settings.
Example of exported key in base64 format
- base64
-----BEGIN CERTIFICATE-----
MIIE5DCCAsygAwIBAgIQM/9SlLjzJLBHaSgQVsIEPzANBgkqhkiG9w0BAQsFADAu
MSwwKgYDVQQDEyNBREZTIFNpZ25pbmcgLSBhZC1mcy5wYXNzd29yay5sb2NhbDAe
Fw0yNTAyMTkyMDA3MjFaFw0yNjAyMTkyMDA3MjFaMC4xLDAqBgNVBAMTI0FERlMg
U2lnbmluZyAtIGFkLWZzLnBhc3N3b3JrLmxvY2FsMIICIjANBgkqhkiG9w0BAQEF
AAOCAg8AMIICCgKCAgEAs6isogLhwqdncR1tYqKgS+Dwmi3DOIMfDpQNgaD/S5Vd
FngFsZ048zfYqJAn9Ypnu8UCTftoKJ2BQzRPoqaT2lpaAivyTDLKBMmbaAyOHoQH
RAd6NQazUYcbW2vMWwA4sa8hTDwwwZPOFhx3AR5EbW4IQo0sHWHOYCIWmH0td9+4
Lqiy7VkHT3fcUCuDL+kopjnsvdJLvbpg7ZPFkYLgy/ANP9+90yt/L1/Mj682bV3b
HgaPbAOzaG7qS6pA94wPmKYLnNf2C89vSfBaA+KjfWjhK5YMPbWLUxolNX7zz6bx
BQKdU/W7pTQIIIffy0rLNwWyaQbKKh77C9OKWLE3k54OhNAyJHXF332CK7psPSVT
fRDqagYGZQF/EhPQG7kMPpr6IiZ76v9FmZz59ruYaLA9f0YYK2NpiLdY1EHLdm19
H+72T/ZFEOLKExr+BbEOcQAlnqGXSs0YdrWTwMEBCqnrPiS4153298VEqKto1sUz
hqnBookmLgUymqApN50KIffezRK/ghfoxBY16EzlYAyVyWqaAB5WEAbCgdB2p9RN
KZHeYz3iB/cQzps1DYsZhZJ9SLS0yr8aQgYMl0PyKS7ajPR9GlGSKKz/7Q6POOtY
jz7qLcBgApacUJfOqUr2OcPzU/TsvRyHhPNzW41hIEjGWBVJ6WlpUFQYJxp5rxkC
AwEAATANBgkqhkiG9w0BAQsFAAOCAgEAbKOjd7u1qnVfL4HsVNSCSUTqXI4knvxI
NKQxZWCpkdCxPzpJdtMPsGukZQAblEcgQPX+v94F32BA2bk8cgp08ra2OrXEXR7r
XCCm3BvUAsI6nmbzKHPm6y/3awadOu59k8qE1c+DRSrHHM9927Z4QWMKYLfKEQL4
4WBYbw/jgqs7HqMbxrdfCtNdQzGKcE+sVaT9OnDp86TopHbsndRUyXqfqkB/LSbq
cstg/cC1b9xJ+FI3xUXEl/33e9/p8ovFko5slW5kU6qET9cg6GA0OreIb+8FbbiV
LOll4aIsn44/wQ6mu3biw77l1TpoUQpf11G9fpuOV10WRttOtk4IsryMhsbrGa/R
RZMbWH2MgkLs1VlcigrUE6kMIkU743d8oyLQb7N4+O+h56YLIuWWXUMM1FNNCIov
tVutUBpSO6OgTUo5tcD9uqaD5R1+rf5A68yUslMgU+4mE9hdY/143bZMDPexKcUt
jfZOI9v4ppmoFgeWZDYMtxU40OkYZh/grnxw9aoZEPLfr8Vnf+LhGvhEFWKvvwdv
J7n49c1WxZxK7rDaSwKeydgLC1bySFQoiYkOucfO+NcdBi6R44cXBrWk1EESLuCq
X2LLIS2NoKg8pX2BPqPcTuZGclEivpg0rrovksNj3L3BRtFO3jWooqxxOfVUbk8h
uFmSLzpAW1I=
-----END CERTIFICATE-----
Filling in the "Additional Settings" value
Currently, Passwork does not provide an algorithm for processing additional identification during SSO integration, including various types of biometrics.
In case of identification errors resulting from exchange with the IDP (Microsoft Entra ID), you need to place the following content in JSON format:
- json
{
  "security": {
    "requestedAuthnContext": false
  }
}
Open the login window in the Passwork web interface and log in via SSO to verify correct configuration: